Sound Thinking
User Guide /Documentation
Sound Thinking is an online chord and scale encyclopedia for stringed instruments. It's available online, exclusively here at TheoreticallyCorrect.com. And it's a free music web app.
Sound Thinking displays chords, chord voicings, scales, scale fingerings, and modes for any stringed instrument. Use it to explore chords and scales in virtually any tuning, on any instrument, from two strings to ten strings.
Here's an example of an Instrument window in Sound Thinking. It displays the A blues scale for guitar in standard tuning. The tan circles highlight a particular fingering for the blues scale. Simultaneously all other possible fingerings are shown in blue across the entire fingerboard. The entire expanse of possible fingerings is called a "scale overview."
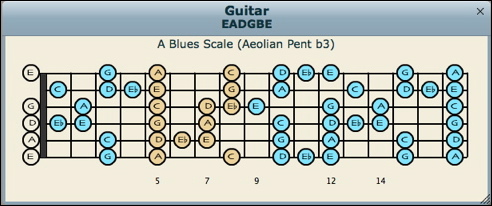
This instrument window is oriented in horizontal layout—which is the norm when viewing scales. In Sound Thinking you can rotate the view to vertical layout—the orientation people usually use when viewing chords.
Below is a screenshot of Sound Thinking's Inspector window. The Inspector displays the properties of the currently selected instrument window.
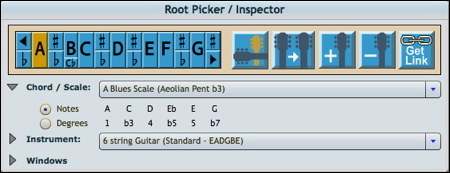
In this example the Inspector displays the the selected scale of A Blues Scale. And it shows the selected instrument of guitar in standard tuning (EADGBE). The Inspector also includes controls for duplicating, adding or deleting Instrument windows, for adjusting the root of a chord or scale, and for showing and hiding other windows and controls, and for saving links to what you've explored.
Try out Sound Thinking ... free, online, only at TheoreticallyCorrect
If you haven't tried Sound Thinking yet, click here to give it a spin.
You'll find instructions on using Sound Thinking below. This includes a list of features and a list of keystroke shortcuts that provide quick effortless control of Sound Thinking. Although Sound Thinking's interface is simple and quite intuitive keystrokes allow you to control Sound Thinking more quickly and easily, so it's worth studying the shortcuts chart.
With Sound Thinking you can explore chords and scales in popular guitar tunings like EADGBE (standard tuning), DADGAD (the Celtic favorite), DADF#AD (D tuning, great for slide and Delta Blues), DGDGBD (Slack key /G tuning), GBDGBD (Dobro tuning) and dozens of other guitar tunings ... and there are dozens more alternate tunings and instruments.
You'll find that Sound Thinking provides far more information than any chord or scale book. The presentations are more organized, and it's interactive: you can view chords voicings atop a chord overview, or view a specific scale fingering atop a scale overview. And it's great for looking up chords and voicings, particularly when you're interested in seeing neighboring alternatives.
Features
If you're already familiar with Sound Thinking, jump ahead to the list of new features.
Multi-window web app
Sound Thinking is an advanced web application. It includes moveable, resizable, free-floating windows ... just like a desktop application. And it has a Preference window where you can customize its overall appearance.
Essentially Sound Thinking is a cloud application. Presently it requires Flash, which means it will run automatically on your if your browser has the Flash plug-in installed, which it probably does. Sound Thinking runs on Android mobile devices, however Sound Thinking does not yet run on Apple's iOS devices such as an iPad or iPhone.
Overview
Starting Sound Thinking
When you start Sound Thinking it automatically displays a C major chord mapped out across the fingerboard of a six string guitar in standard tuning (EADGBE). You can reset the root, the chord or scale, or change to a different instrument or tuning.
The Root Picker
You can change the root of any chord or scale by clicking a root in the Root Picker. Here's a picture of the root picker with a C root selected.
![]()
The Chord/Scale Picker
In the Chord Tab you can select any type of chord, such as a minor 7chord or dominant chord. Chords are grouped into logical families: Major, Minor, Dominant, Flat 5 and Sharp 5.
The Instrument/Tuning Picker
You can select from a library of predefined instruments ... or create your own custom instruments. Instruments are ordered by name, or by number of strings.
Capos
There are lots of capo possibilities in Sound Thinking:
- you can add a capo at any fret
- you can add any type of partial capo at any fret.
- you can add a full capo plus a partial capo ...
- it's even possible to add multiple partial capos.
Sound Thinking is a great tool for exploring partial capo possibilities. For instance it can help you visualize and discern the similarities and differences between DADGAD open tuning and Partial DADGAD.
Read more about partial capo.
Future plans
Other features are on their way, like chord progressions, chord voicings, and chord collections, chord permutations, making a collection of your favorites ... plus dynamic demonstrations of music theory, and sound. (Sorry, no sound yet.)
What's new in Sound Thinking?
Prior to the release of Sound Thinking version 1.0 a public beta was online for several months. Much has changed since then. The interface has evolved considerably and there are several significant new features. Here a list of some new features in version 1.0.
Help/Documentation link New!
When the Windows area is open (click the triangle to toggle it open or closed) you'll see a Help checkbox. Check this to open the Help window. It contains a link to the current documentation online.
Scenes links New!
![]()
Got Link? Sound Thinking 1.0 has a Get Link button. It copies a 'scene link" onto your clipboard. From a technical perspective a scene link is a URL (a web address ... and it's a loooong one with lots of grimy looking stuff.)
Scene links are significant. They are like "saving" a Sound Thinking "document." The link allows you to return to information that you've created in Sound Thinking. Once you've arranged Sound Thinking to a particular state, you can return to the state at anytime. You just get the scene link, and save it or bookmark it.
An online link collection
Here's an extensive web page of Sound Thinking scene links. The web page uses the Sound Thinking App ... but it's simply an ordinary HTML webpage that shows how powerful scene links are. It's a collection of chord and scale examples, scenarios and comparisons. Any one of these scenes might take a few minutes to set up. But a scene link transports you to Sound Thinking with everything set up in the state saved in the scene.
Scenes links allow you to capture or share your experience with Sound Thinking in a number of ways:
- You can "bookmark" a specific setup that you've created in Sound Thinking so you can easily return to it. Once you're there you can manipulate the every aspect, just as you normally can with Sound Thinking. And if you create another scene worth saving, just get Get Link.
- You can paste a scene link URL into an email—this is a great way of inviting others to see what you're exploring or illuminating with Sound Thinking.
- Anyone can place the scene link URL as a hyperlink on a web page, like page of scene links mentioned above. In other words you can illustrate and express musical concepts by sending people to Sound Thinking via a scene link on your web page. A picture's worth a thousand words and you can easily illustrate any chord, chord voicing, scale, or scale fingering.
- You can paste the link into interactive documents like PDFs. If the reader is online when clicking the link the scene will open in Sound Thinking.
Steps for "saving" your scenes New!
![]()
Like many other cloud apps, Sound Thinking does not save information to your computer or device. However, after you've created a Sound Thinking scene, you can save a link to it. This allows you to revisit it and modify it later.
You can share any scene link with others via links in emails, indocuments or PDFs. And you can save it in a webloc to you computer.
Here are the two simple steps for saving your scene:
- Press the toolbar's Get Link button. (This places a long URL in your device's clipboard.)
- Paste it somewhere ... into any hyperlink, in a web page, in an email, or in a document)
The preliminary step it placing the scene link (a very long URL) into the browser's address bar:
- After you've constructed your Sound Thinking scene, and you've pressed the Get Link button ...
- Open a new browser window (so your Sound Thinking window remains open, in case anything goes wrong.)
- select the entire contents of the browser's address bar. (One method is to triple-click the URL in the address bar)
- paste the scene link. NOTE: This replaces the browser's previous URL address with your scene link ... AND it assumes that the last use of your clipboard was when you pressed Get Link!
- refresh/reload the page. Once the scene assembles itself it is bookmarkable.
Bookmark a scene in your browser:
- First perform the instructions above.
- use your browser's bookmark feature to save a bookmark of your Sound Thinking scene.
- choose the bookmark anytime you want to recreate or modify that scene.
Create a webloc:
First a few words on weblocs and fav-icons.
- On Mac OS a "webloc" is a "web location document" It's a tiny document with a .webloc extension; it's also called a web shortcut. You may want to keep a folder of Sound Thinking weblocs for your various creative sessions with Sound Thinking
- A favicon is the little icon at the left of the address bar's URL. This icon usually differs from site to site. It provides an easy way to create a webloc.
Making a webloc:
- drag the favicon to your desktop or to any open folder. This saves a webloc to that location. The webloc's default name may be rather generic—fortunately you can reaname, as long as you leave the .webloc extension.
Using the webloc:
- simply double-click the webloc
Sharing your work — adding scene links to email, documents and webpages: New!
Adding scenes to email or documents:
You can invite friends or students to view your scenes via hypertext links in emails or documents. They just click the link and the rest happens automatically.
If you're not good with hyperlinks you can simply paste a scene link directly into an email or text/wordprocessing document. Anyone reading the email or document can easily view the scene by copying the link and pasting it into a browser's address bar. However putting your scenes into a hyperlinka significantly cleaner and more reliable.
Adding scenes to a Web page or Blog:
If you have a webpage or blog you can insert a standard scene link via a standard anchor elementd href.
For instance, here's a link that opens a scene with two guitar windows. In this scene a single blues scale is displayed in two ways:
- one window shows a blues scale in "degree view": 1, b3, 4, b5, 5, b7
- the other windows shows a blues scale in "letter name view" in the key of A: A, C, D, Eb, E, G
- both have a particular fingering highlighted at the 5th through 8th frets.
- Most of the scene's state if preserved. All windows are sized and positioned as you oriented them, and disclosure areas are appropriately opened or closed in the Inspector.
Multiple instrument windows & Property inspector New!
Originally Sound Thinking displayed just one instrument at a time, which is a limitation of most chord finders.
The new release can display multiple instruments simultaneously. This allows you to:
- simultaneously view the same information vertical and horizontal orientation.
- set up a number of different chords and scales for the same instrument
- view different instruments or tunings simultaneously, to illustrate similarities and difference between them.
- view the effects of a capo, contrasted to the same instrument uncapoed
Inspector Window New!
When displaying multiple instruments the screen can easily become crowded. To economize on space we added an Inspector window. The Inspector window is a central location that displays the properties of various instrument windows*
Whenever you click an instrument window, the properties in the Inspector update to reflect the settings for that instrument, and the window's title bar darkens to indicate it's the one affected by the Inspector.
* If you used a previous version of Sound Thinking you'll notice that the Instrument windows no longer house the Root Picker or other controls and displays. Those have been moved from the top of the Instrument window into the Inspector window.
The Inspector's Disclosure Areas New!
The instrument panel is configurable and has four main sections called disclosure areas. You may show or hide some of these areas, by twirling the respective disclosure triangles.
- the Toolbar: contains the Root Picker and some buttons (Instrument orientation, Duplicate instrument, New instrument, Delete instrument, and Get Link)
- the Chord/Scale area: contains a menu for choosing a chord or scale; also displays the numeric formula, and letter names of the notes spelled according to the selected root. (This is practically identical to the Chord/Scale picker window.)
- the Instrument/Tuning area: contains a menu for choosing an instrument or tuning; also displays the names of the open strings, and the number of half steps (or frets) between strings. (This is practically identical to the Instrument/Tuning picker window.)
- the Windows area: contains checkboxes that allow you to toggle the visibility of various window and window areas, including a Help window.
Closeable Pickers for Instrument/Tuning and Chord/Scale New!
In the original release of Sound Thinking the Instrument/Tuning and Chord/Scale picker windows were always open. In the new version they are closeable ... and when you start Sound Thinking they are closed by default.
As mentioned previously, the main reason for this change is to leave more screen real estate available. Nevertheless, as before, you have the option of keeping the Instrument/Tuning and Chord/Scale picker windows open via their checkboxes located in the Inspector's Window area.
Menu access to pickers in the Inspector window New!
Even when the picker windows are closed you can access them temporarily (like a dialog box) by clicking the Chord/Scale and Instrument/Tuning menu buttons in the Inspector. So there is no reason to leave the stand-alone pickers open unless you want to.
The popup pickers work slightly differently than the stand-alone picker. They preview the changes on the Instrument, but only apply the changes if you click OK, or double-click you choice.
Wind the stand-alone picker, the changes are instantaneous, and occur when you click the mouse.
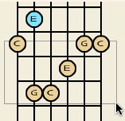
Vertical and Horizontal views New!
![]()
Now you can view any instrument vertically or horizontally. Just click the Inspector's orientation button, located in the Toolbar. The Toolbar also house buttons for duplicating an instrument window, creating a new instrument, deleting an instrument window, and putting a "scene URL" on the clipboard.
Duplicate instrument New
![]()
This allows you to create a copy of an existing instrument, so you don't have to recreate it from scratch. After you've duplicated and instrument you're free to change any of it's properties. You can even turn it into another instrument, while retaining the current chord/scale and root.
Drag Select fret bubbles New!
 There are a few ways to select fret bubbles.
Click or shift-click to toggle a bubble's highlight.
You can drag to select and highlight a range of fret bubbles— new since version 1.0. ("New since version 1.0 sounds funny, but this feature was not in the beta release.)
There are two drag select modes: • The default selection style for chords is "one bubble per string" — this makes sense for chords, because you can only sound one note per string • The default selection-style for scales is all-within-the selection-rectangle; this makes sense because there are usually two or three notes per string in a scale.
You can change the behavior when selecting while viewing a chord—just hold the Option/Alt key.
Shift-drag to change or extend or reduce the selection. Shift-click to change a include or exclude a single note.
Shortcuts / Keystrokes
| Window | Keystroke | Impact / Explanation |
|---|---|---|
| Chords Scales and Modes | up arrow | Selects and displays chord above the currently selected chord |
| down arrow | Selects and displays chord below the currently selected chord | |
| Instrument windows | A, B, C, D, E, F, G — o r — a, b, c, d, e, f, g |
Sets the root to the letter typed. You can type lowercase or upper case letters. (The affect the last selected instrument window, the one with the highlighted title bar.) |
| up arrow | Raises the root one half-step. When Sound Thinking increments the root it selects the most common enharmonic. For instance Eb is more common than D#. Eb is an actual key signature. Although the key D# appears on the Spiral of 5ths, it is beyond the scope of the Circle of 5ths, and is not considered a normal key. In part this is because it has double sharps in its key signature: F## and C##. All other notes single single sharps: D# E# F## G# A# B# C##. (Weird, huh.) IMPORTANT NOTE: If your browser window is small Sound Thinking may invoke some scroll bars so you can navigate through the entire workspace. When scroll bars are present the arrow keys may not function as described here; instead they may scroll the browser window instead. As a work around make you browser window as large as possible; when the scroll bars disappear you should be able to use the arrow keys to control the root picker. |
|
| down arrow | Lowers the root one half-step. | |
| shift modifier key | The shift key reverses the effect of "up" and "down" arrow. With the shift key down:
|
|
| Instrument and Tunings (In the "tuning" area |
up arrow | Selects the previous instrument in the instrument picker list and changes the the instrument (the tuning and possibly the number of strings.) |
| down arrow | Selects the next instrument in the instrument picker list and changes the the instrument (the tuning and possibly the number of strings.) | |
| [ ] brackets | The bracket keys move left and right through the Root Picker. ] moves "upward" chromatically. [ moves "downward" chromatically. |
|
| + – (plus, minus) | + When the root state is "natural" or "flat" the + key makes the root "sharp." When the root state is sharp, the + key toggles the state between sharp and natural. – When the root state is "natural" or "sharp" the – key makes the root "flat." When the root state is flat, the – key toggles the state between flat and natural. |
|
| = | Switches the root to the enharmonic equivalent. For instance, it changes an Gb root to F#. Conversely it switches F#to Gb. | |
| t | Toggles between notes view and degree view. Note view shows the letter name of each note on the fretboard; Degree view show the numeric degree, 1, 2, 3 ... for 1st, 2nd and 3rd degree. | |
| L, h, v, | Toggles the layout/orientation of the selected instrument window: L toggles the view between horizontal and vertical; h chooses horizontal; v chooses vertical. You can use lowercase or uppercase letters for these commands. |
Features
| Topic | Feature | Instructions / Explanation |
|---|---|---|
| Capos | Add a capo |
Just choose a fret from the Capo menu located in the Instrument area of the Inspector. This is an easy way of adding a full capo. This method is only partially implemented in version 1.0, and has a couple of bugs. Alternately, and reliably, you can use the Add capo contextual menu. P position the mouse over any fret, then right click (or command-click on the Mac.) This opens a contextual menu where you can choose: Add Capo. (You can add additional capos and partial capos with this technique. See partial capo, below.) |
| Remove a capo | Position the mouse over the fret with an existing capo. Right click (or command-click on the Mac.) This opens a contextual menu where you can choose, Remove Capo. Alternately use the Capo button in the Inspector, but presently this may remove other capos. To be fixed in version 1.01 | |
| Partial Capo | When you add a capo you get a "segmented" capo which you can turn into a partial capo. You can click any individual segment to remove (or restore) the capo from that particular string. Click again to toggle the capo back on. The result is a partial capo, exactly like turning the cams on a Third Hand Capo. | |
| Multiple Capos | You can add more than one capo. Multiple capos allow for unlimited exploration of partial capo techniques. Right click any fret and add a capo. Multiple capos are probably of interest only to people using or exploring partial capos. | |
| Move a capo | Presently you have to Remove the capo and Add a new capo. In the future you will be able to drag the capo to any fret. If you only have a single capo on your instrument, you can use the Capo menu in the Inspector. If you have other capos, this may delete them. To be fixed in version 1.01 | |
| Instrument | Change Instruments | To change instruments (or instrument tuning) simply choose from the list in the Instrument and Tunings panel |
| Multiple Instruments | Sound Thinking allows you to have multiple instruments open simultaneously. It starts up with a guitar in standard tuning. You can duplicate this instrument or any existing instrument with the Duplicate Instrument button. You can add a new instrument with the New Instrument button, and choose it's tuning from the popup list. These options allow you to view the same instrument, side by side, but perhaps viewing a different chord or scale ... or you toggle the orientation of one, or display one in Note view and the other in Degree view. Alternately you can view a number if different instruments simultaneously, perhaps displaying the chord or scale. It could be the same chord or scale on two instrument. Or the comparison of a capoed and uncapoed instrument. The possibilities are endless. |
|
| Views | Note view (Letter names) | In the instrument window, click the radio button to the left of the word Notes. The fretboard updates to show letter names. |
| Degree View (scale degrees) | In the Inspector window, click the radio-button to the left of the word Degrees. The fretboard updates to show scale degrees, instead of letter names | |
| Grip View (Capo perspective) | Not yet implemented. This allows you to see letter names spelled as if the capo is the nut. In other words, the letter names are transposed down by an amount relative the the capo position. If the capo is on the second fret, the letter names are two frets (two have steps) lower than the concert pitch (the pitch they actually sound.) | |
| Windows | Chords, Scales and Modes | This window has a number of tabs. There's a separate tab for chords, scales and modes. In the left column you can choose a chord family: Major, Minor, Dominant 7, etc. Then on the right you can select a member of that family. If you don't know what family a chord belongs, select. All in the Chord Family column. The right column then display all chords. |
| Instruments and Tunings | Select a type of instrument in the family column. Then select a tuning to the right. You can sort columns by clicking on their header title. | |
| Sorting Columns | The Chord/Scale and Instrument/Tuning windows display several columns and rows of information. Sound Thinking displays the rows in a particular default order. This order is logical, but not based on an alphabetical sort. However you can sort the rows in the table by ascending or descending alphabetical order of the contents of any column. To sort, just click the header title at the top of any column. This sorts the rows by the elements in the column you clicked. Once a column is sorted little black arrow/triangle appears on the right side of the header: an arrow pointing upward indicates that the column is sorted from "A to Z"a downward arrow indicated the column is sorted from "Z to A". Numbers are sorted before letters. (NOTE: each picker has two sides, divided by a vertical slider; each side is independently sortable.) The rows are in their default order when no black arrow is present in the header. Restoring default order is covered next. |
|
| Restoring default order (unsorting) | Control/Command click (Mac/ Windows) on any header to open a contextual popup menu. Select "Restore default order". | |
| Moving windows | This application works much like a desktop program. You can move any window by clicking and dragging its title bar. | |
| Resizing windows | Click and drag in the lower right corner to resize a window. | |
| Preferences | Choose Edit/Preferences from the applications main menu (these options mainly effect the appearance of the Fretboard window.) Press the Apply button to see the effect. Then Save or Cancel. |

Links on this page: Scenes • Saving Scenes
Return to Sound Thinking Chord and Scale Encyclopedia | TheoreticallyCorrect.com | Singingwood.com
Links on this page: Capos • New Features • Keystroke Shortcuts • Features